

Resource Management
Resource Management is where you build the access catalog. Each resource is something people can ask for, like an application, a shared drive, or a building, and behind every resource sit one or more groups. Approve a request and Adcyma adds the person to those groups. Let it expire and Adcyma takes them out again. What you set up here is exactly what people see when they click Request Access in the Access Center.
When to Use Resource Management
- Setting up self-service access requests for your organization
- Defining what people are allowed to ask for
- Connecting resources to approval flows
- Limiting how long people can keep access to a resource
- Handing day-to-day membership decisions to a resource owner
Page Overview
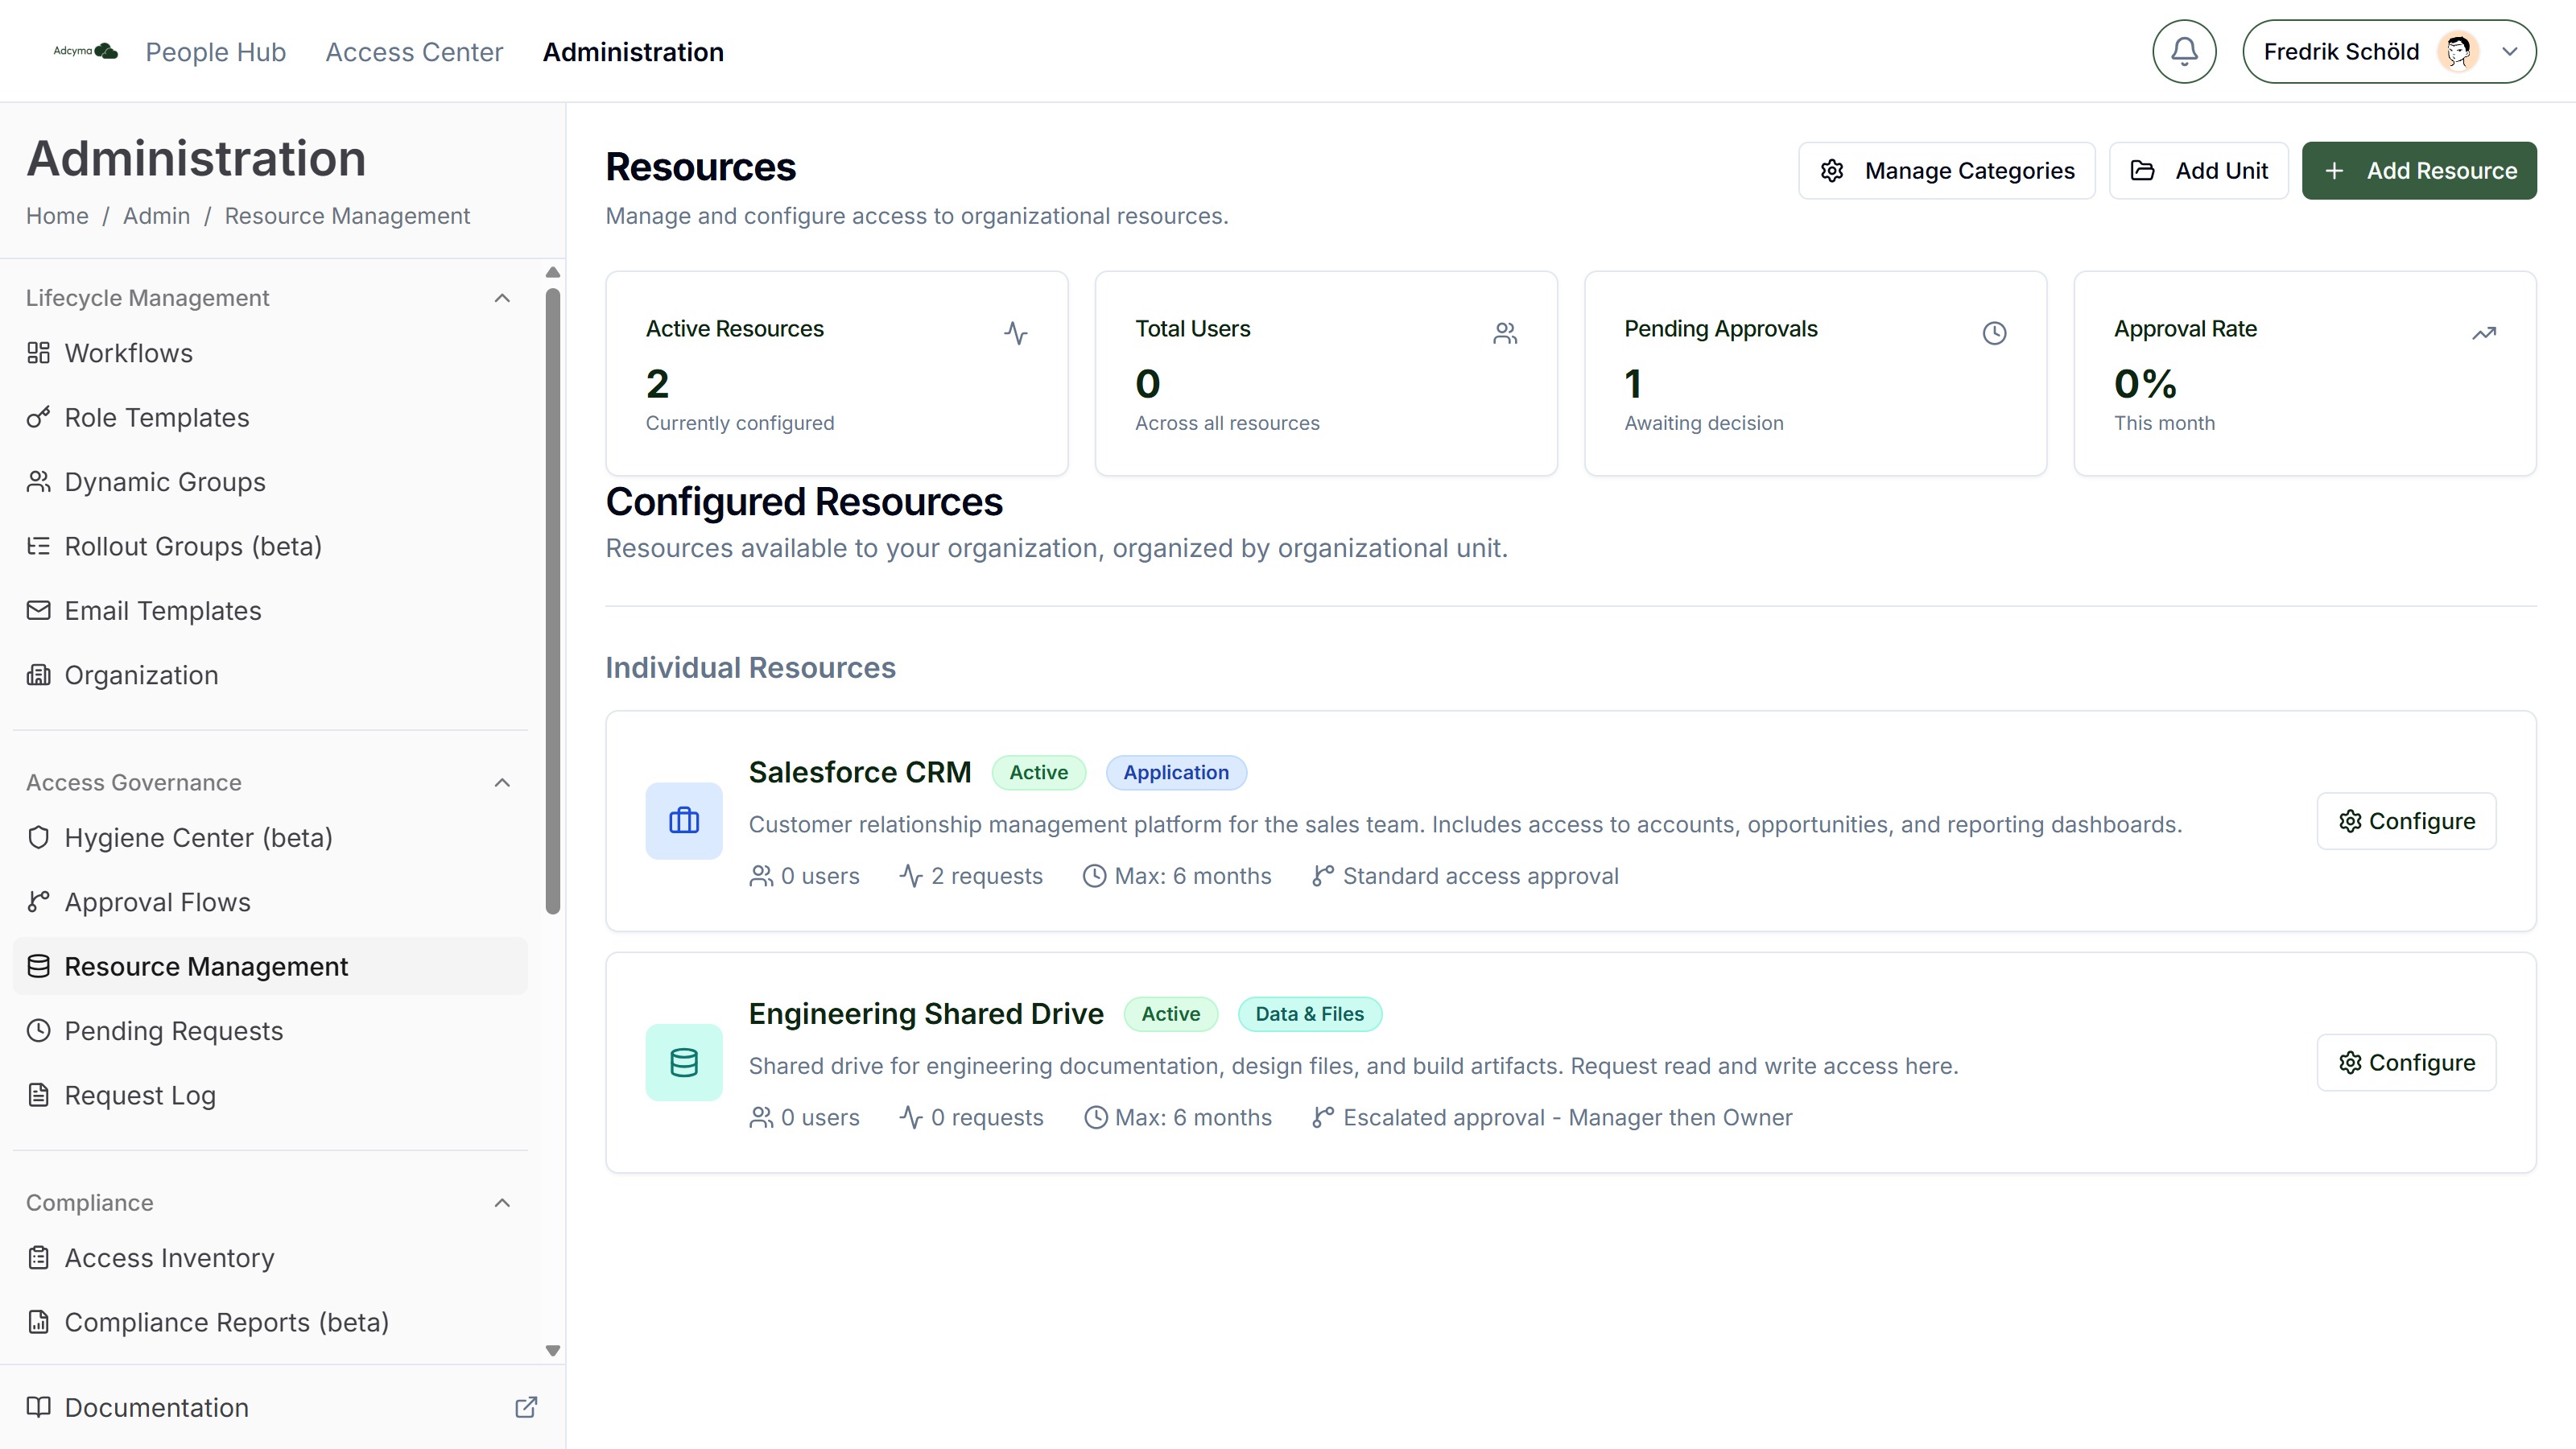
The page header reads Resources. At the top, stat cards show:
| Card | What it counts |
|---|---|
| Active Resources | Resources currently configured |
| Total Users | Users with access, across all resources |
| Pending Approvals | Requests awaiting a decision. Click the card to go to Pending Requests. |
| Approval Rate | Share of this month's decided requests that were approved |
Below that, Configured Resources lists every resource, grouped by organizational unit. Each card shows the resource's icon, status, category, owner, number of users, requests this month, maximum access duration, and either Auto Approve or the name of its approval flow. Click Configure to edit it.
The header has three buttons: Manage Categories, Add Unit, and Add Resource.
At least one Approval Flow must exist before you can add resources or units. Until then the page shows "Create an Approval Flow First" with a link to set one up.
Organizational Units
Organizational units are folders for resources. They keep a long catalog readable, both here and in the Access Center, where the Request Access list groups resources under their unit name. Resources without a unit appear under "Individual Resources" on this page and under "Other Services" in the request list.
Click Add Unit and enter a Group Name and Group Description (both required). To rename a unit or change its description, click the gear icon on the unit's row. Deleting a unit doesn't delete its resources; they move to Individual Resources.
An empty unit shows "No resources in this organizational unit yet" with an Add Resource button that pre-selects the unit.
Categories and Icons
Categories label resources so people can tell what kind of thing they're asking for. Each category has a name, an icon, and a badge color, and a resource takes its icon from its category. That icon is what people see next to the resource in the request list.
New tenants start with six categories:
| Category | Icon |
|---|---|
| Application | Briefcase |
| Infrastructure | Shield |
| Physical Access | Building |
| Data & Files | Database |
| Administrative Access | File |
| Communication & Collaboration |
Click Manage Categories to add, rename, or delete categories. For each one you choose an icon from 19 options (Briefcase, Shield, Database, Mail, Users, Building, File, Key, Lock, Globe, Server, Cloud, Monitor, Laptop, Hard Drive, Code, Terminal, Layers, Phone) and one of ten badge colors.
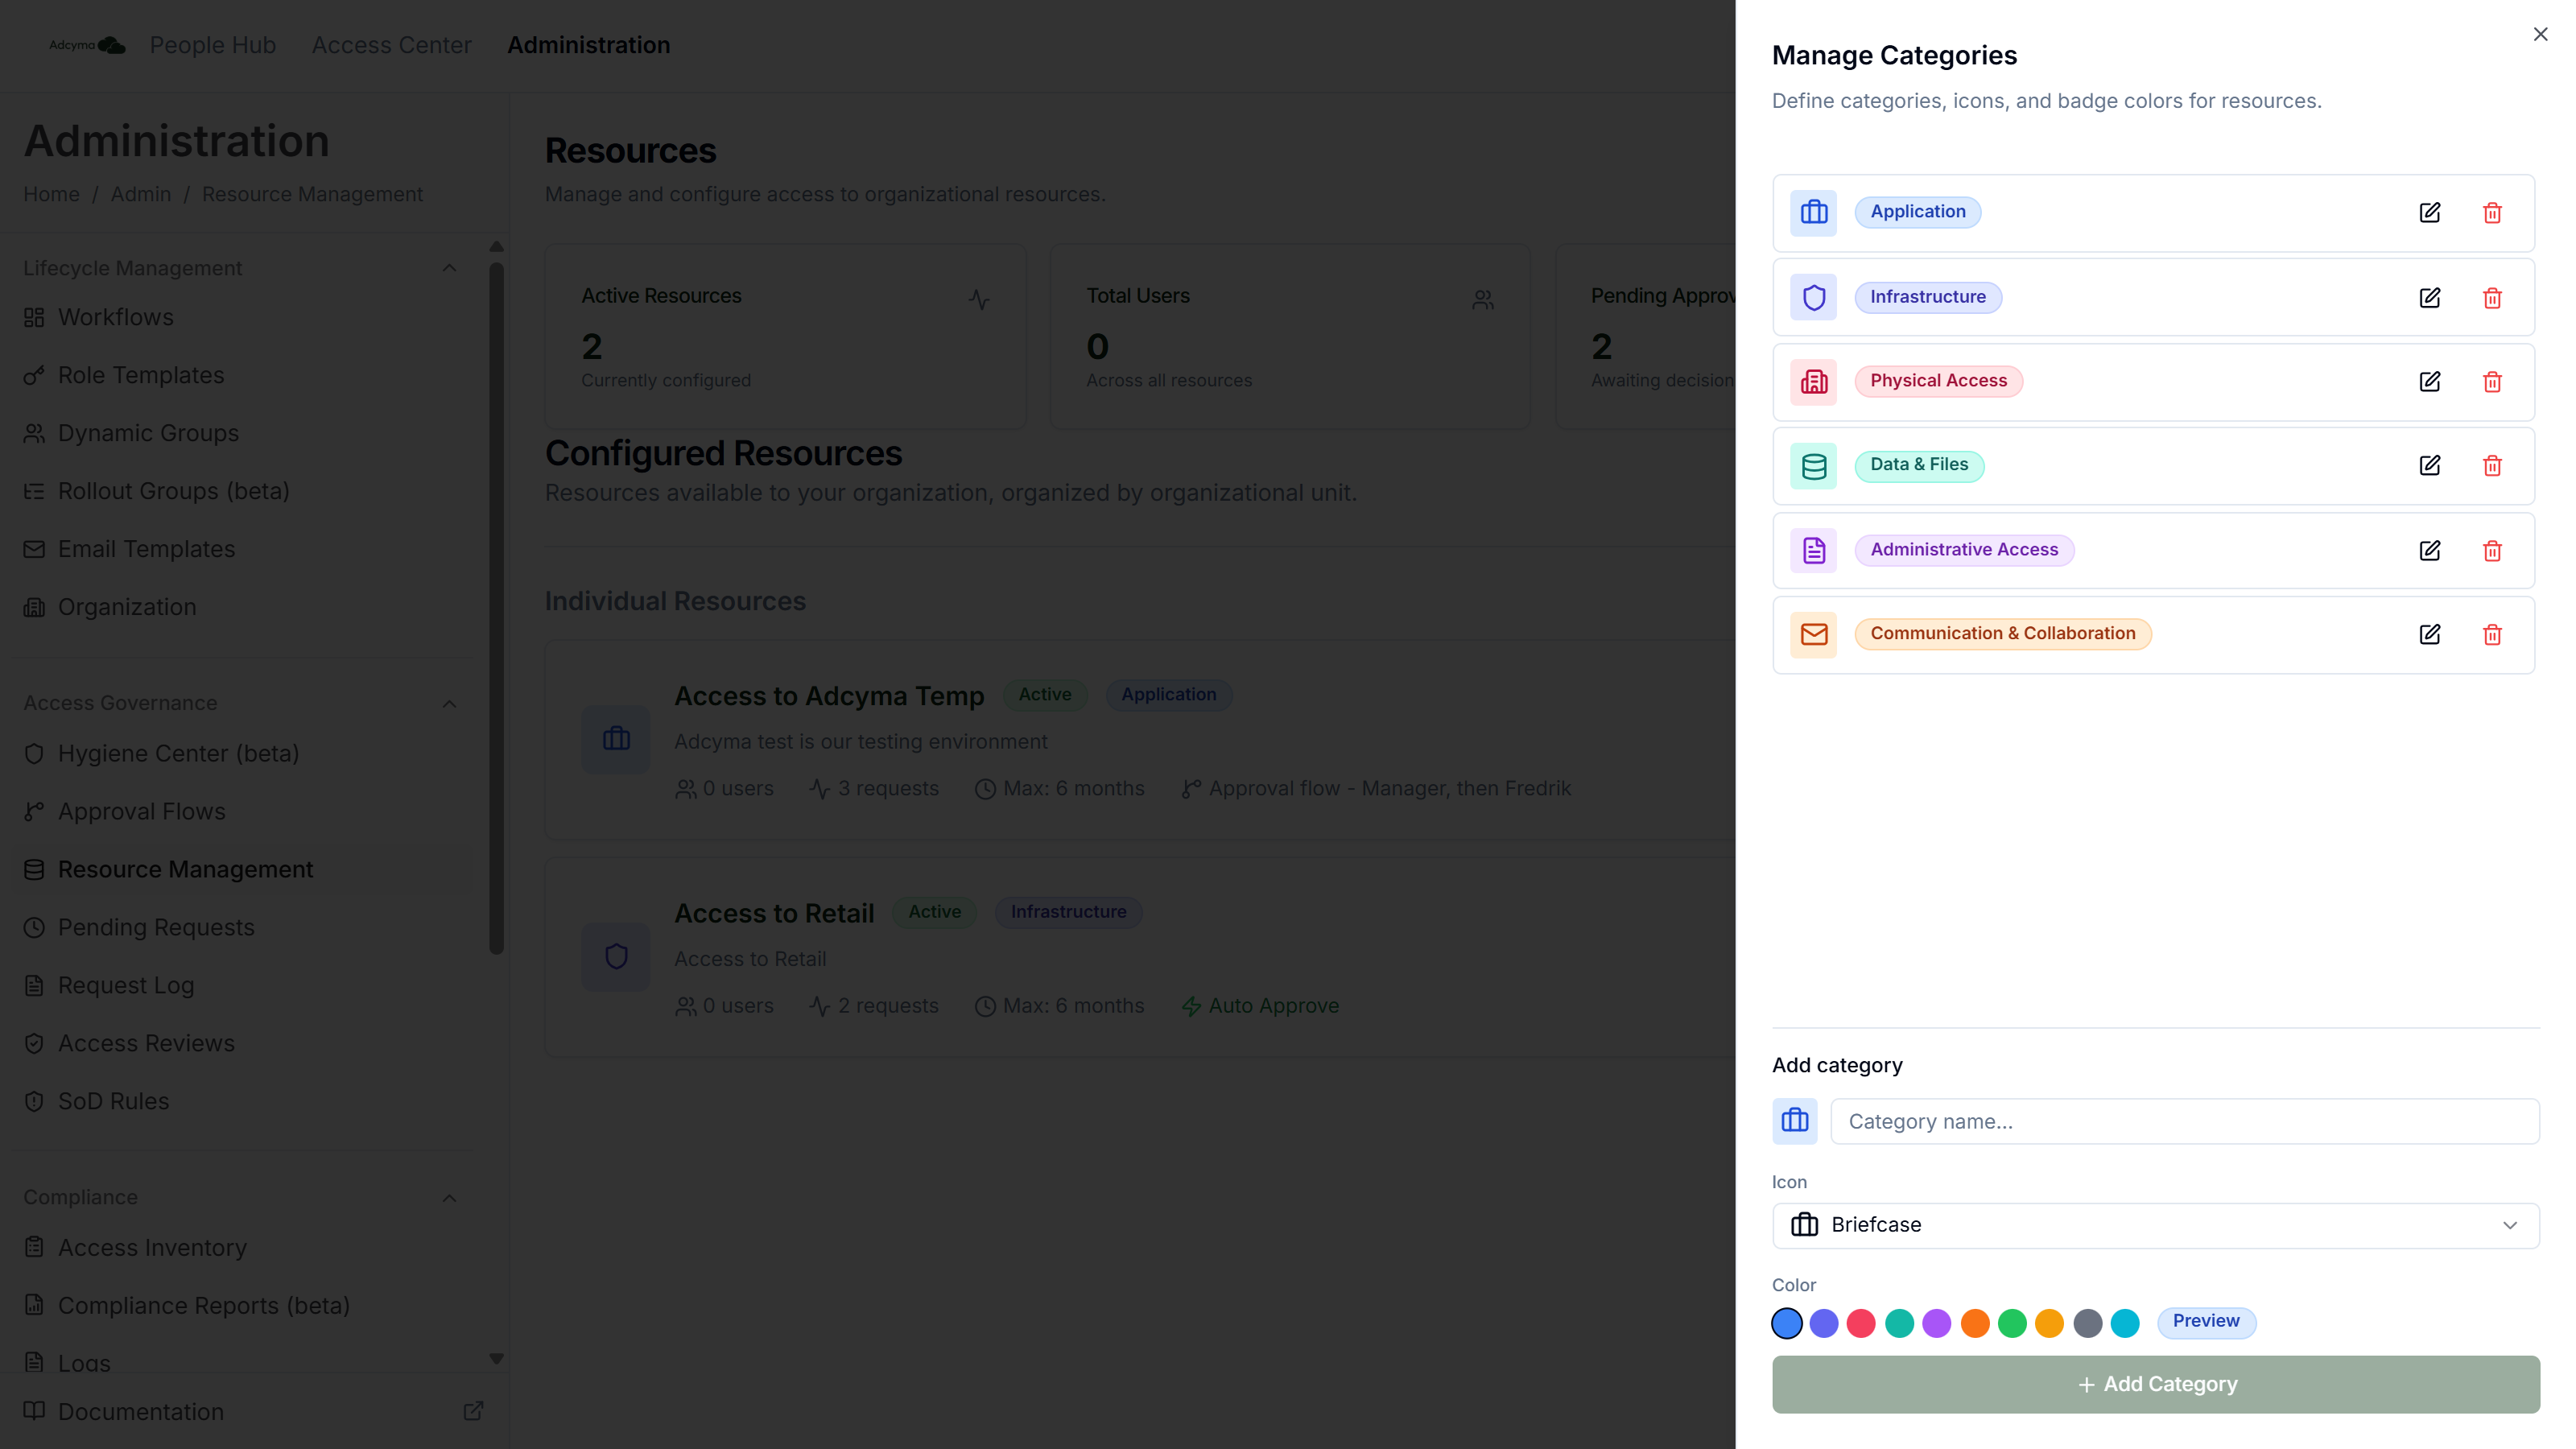
A resource picks up its category's icon when you save it. If you change a category's icon later, open and save each resource in that category to update its icon.
Creating a Resource
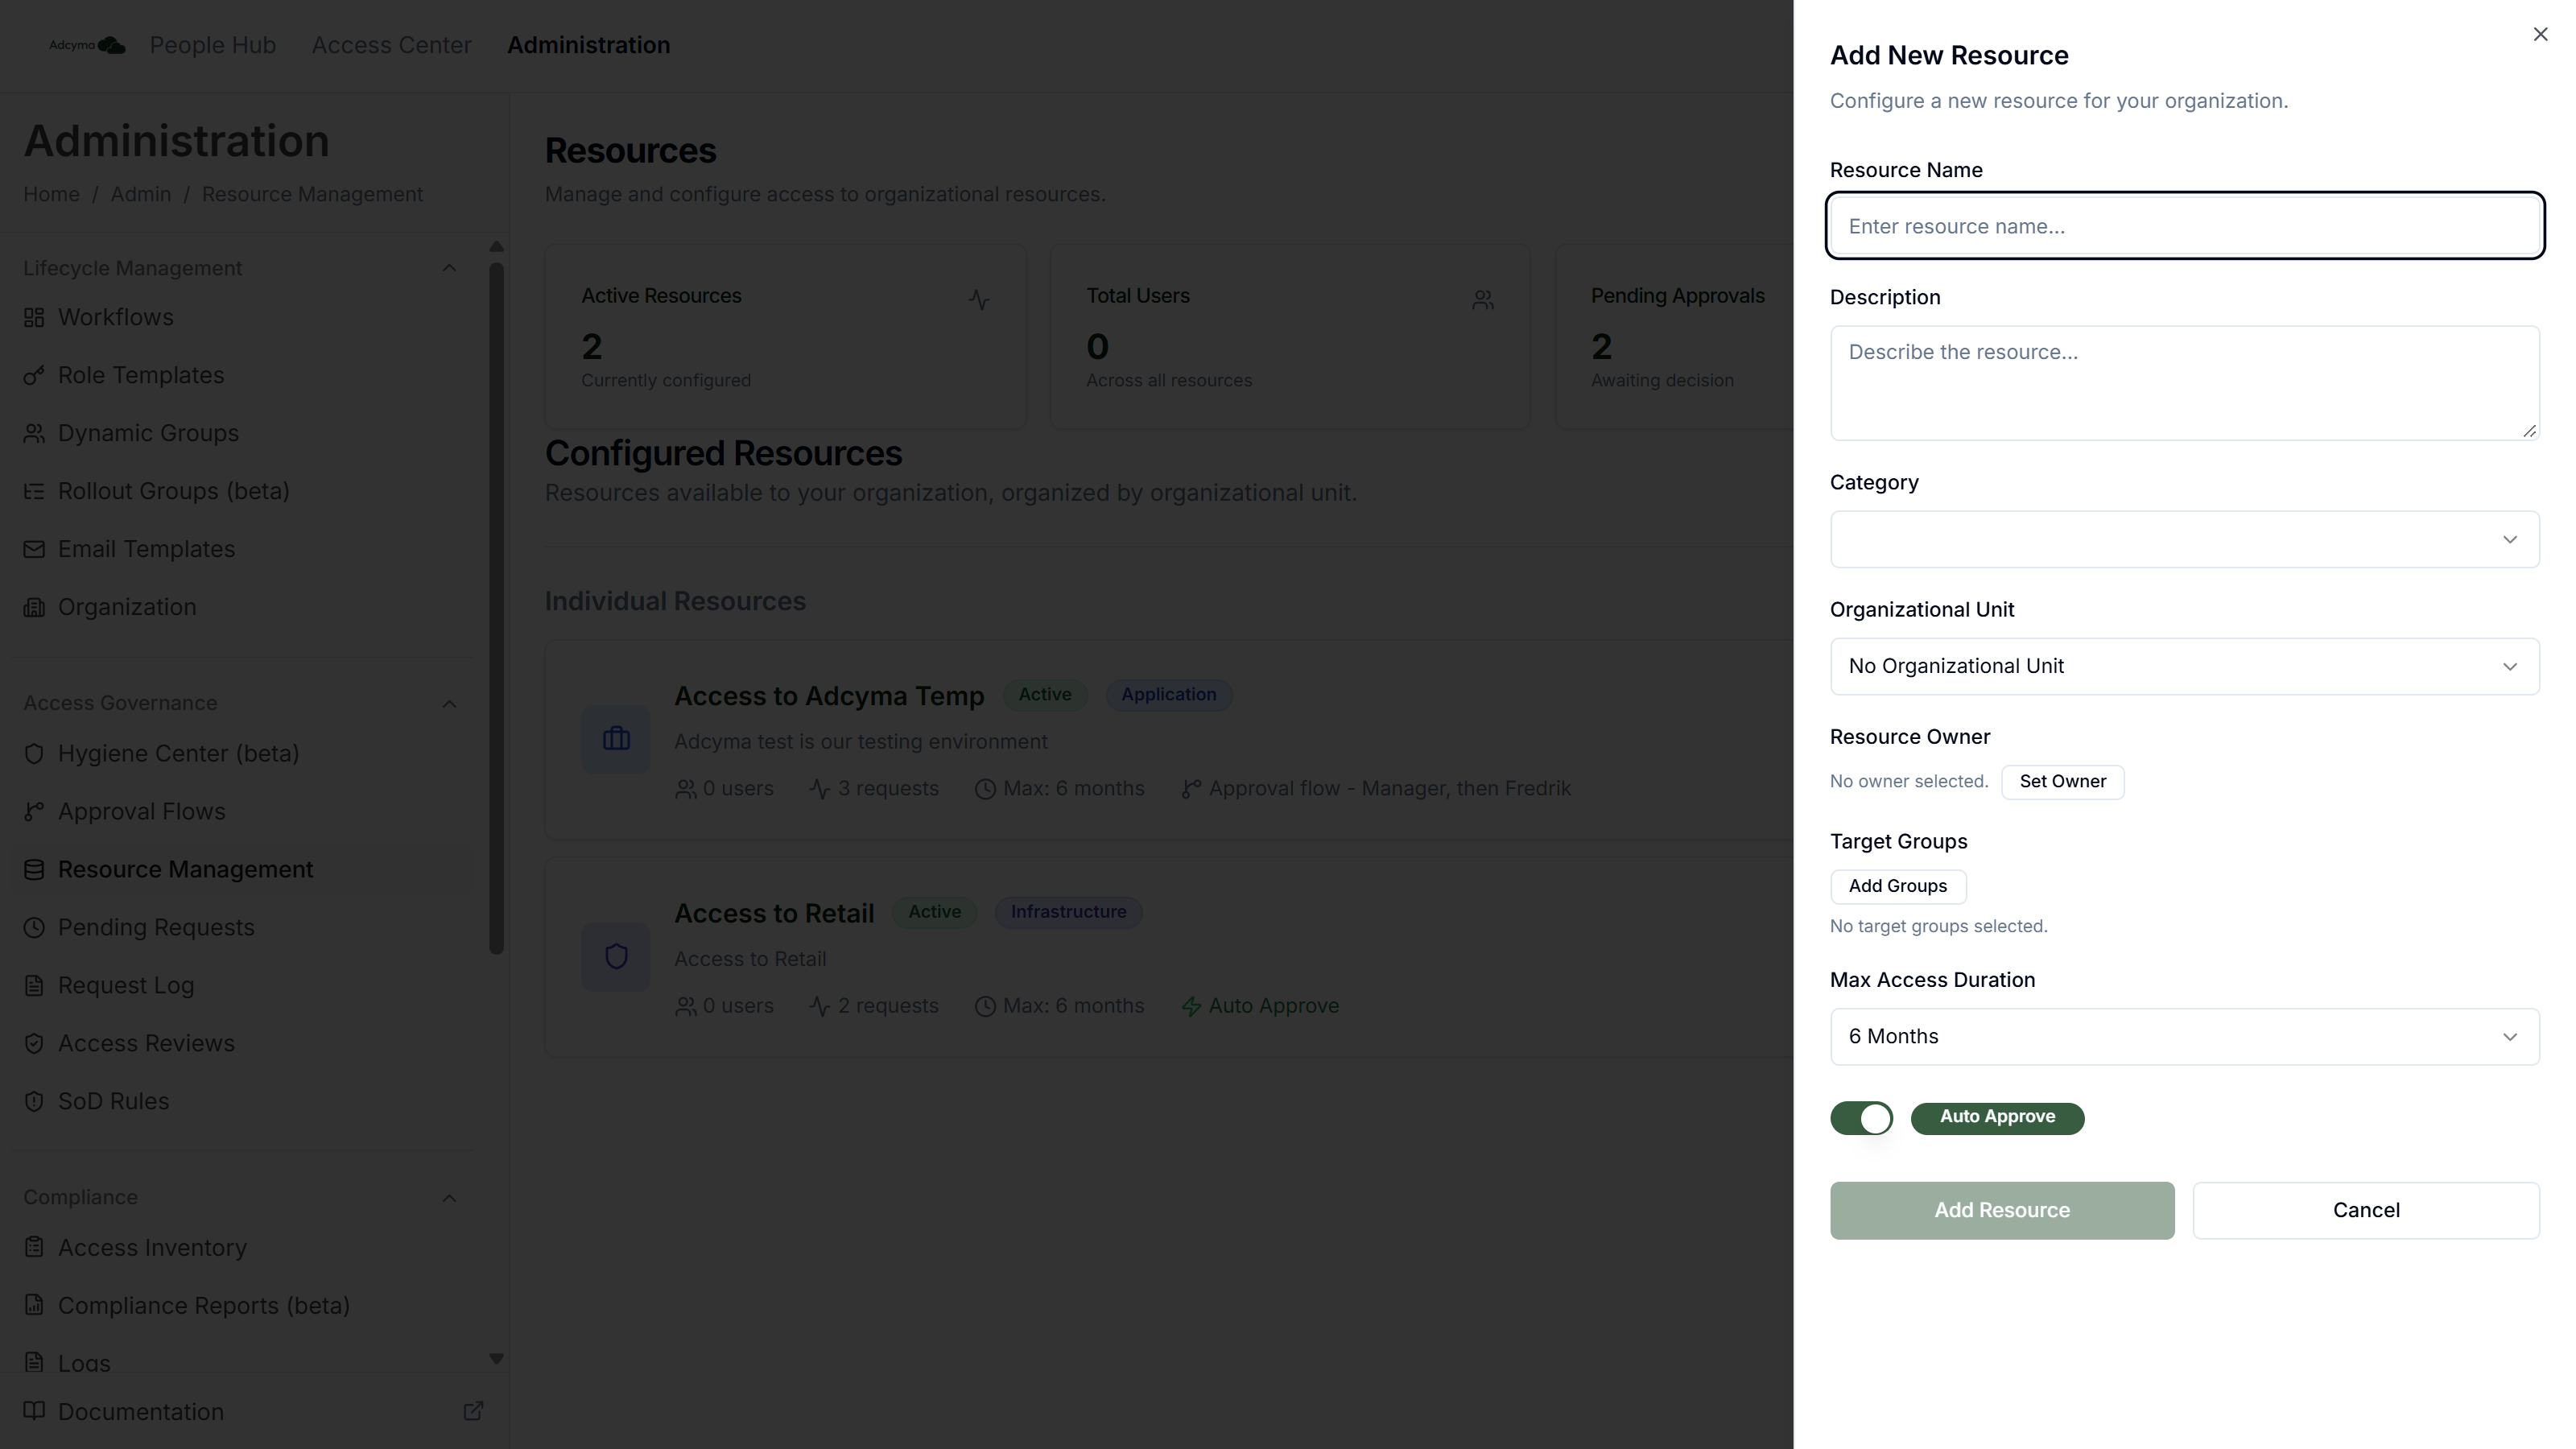
Click Add Resource to open the side panel. Resource Name and Description are required.
Basic Information
Resource Name A clear name people will recognize, like "Salesforce CRM", "Stockholm office badge", or "Engineering shared drive".
Description What the resource gives access to and who it's for. People read this before they decide to ask, so be specific.
Category and Organizational Unit How the resource is labeled and where it sits in the catalog. Pick No Organizational Unit to leave it ungrouped.
Owner
Resource Owner Click Set Owner and search for a user. The owner gets an Owned Resources tab in the Access Center showing who has access, and can be used as an approver through the Resource Owner approver type. If a requester has no manager, the owner also stands in for the Boss (Manager) approver.
Allow owner to manage members Appears once an owner is set. When it's on, the owner can add people to the resource's groups and remove them, straight from the Access Center, without a request or an approval. When it's off, the owner sees members read-only. See Owned Resources.
With this switch on, the owner can add anyone, including an external email address, and no approval flow is involved. Turn it on for owners you'd trust with the group in Entra ID or AD directly.
Target Groups
Click Add Groups to pick one or more groups. When a request is approved, Adcyma adds the person to every target group. When the access expires, Adcyma removes them from every target group. Groups synced from on-premises Active Directory carry an AD badge.
Max Access Duration
The longest access anyone can request: 1 Month, 3 Months, 6 Months, 12 Months, or Permanent. New resources default to 6 Months.
The maximum shapes the duration choices in the request form:
| Max Access Duration | What the requester can pick |
|---|---|
| 1 Month | 1, 3, 5, 7, 14, or 30 days |
| 3 Months | 1 or 3 months |
| 6 Months | 1, 3, or 6 months |
| 12 Months | 1, 3, 6, or 12 months, or 1 year |
| Permanent | 1, 3, or 6 months, 1 year, or Permanent |
Requesters can also tick Pick a specific end date and choose a date, which can't be later than the maximum allows.
The maximum limits what the requester can ask for. Administrators approving from Pending Requests can set a longer duration than the maximum.
Approval
New resources start with Auto Approve switched on. With Auto Approve, a request is approved the moment it's submitted and the person is added to the target groups straight away.
Switch it off to show Approval Workflow, then pick the flow that should decide requests for this resource. Only Active flows are listed.
Leave Auto Approve on only for resources where nobody needs to look at the request first.
What Happens After Approval
- Adcyma adds the person to every target group on the resource.
- If the access isn't permanent, Adcyma schedules the removal for 08:00 on the expiry date.
- On that morning the person is removed from the target groups and the request is marked expired.
You can follow each step in the Request Log, and the Assignments tab in Pending Requests shows what is about to expire.
Importing Resources
To create many resources at once, use the Import wizard with the IGA Services type. Imported resources come without target groups or an owner, so open each one afterwards to add them.
Best Practices
- Write descriptions for the person requesting, not for IT. Someone who understands what they're asking for writes a better justification.
- Keep units and categories consistent so the request list is easy to scan.
- Match the maximum duration to the sensitivity of the resource. Admin access doesn't need a Permanent option.
- Pick owners who actually know who should have access. They make better calls than a central IT team.
- Review the catalog now and then and delete resources nobody requests anymore.
Troubleshooting
If a resource doesn't appear in the Access Center:
- Check that it was saved, and refresh the Access Center
- Check the person has the Access Center User role
If people end up in the wrong group:
- Open the resource with Configure and check its target groups
If access isn't provisioned after approval:
- Check that the resource has at least one target group. Without one, the request is approved but nobody is added anywhere.
- Look for errors on the request in the Request Log
- Check that Adcyma has permission to change the group. For AD groups, check that the AD connector is running.